How Do You Perform a Breast Self-Exam?
- zoeziegler32
- Feb 26
- 3 min read

Updated: May 11
Written by Zoe Ziegler
Sources linked at bottom of page
last updated: 2/25/26
If Im a teenager?
Your right, breast cancer in teens in rare. But what Herscreen project offers is Health literacy before screening age. This is because lifestyle habits start early, body awareness starts early, and hormonal change/exposure starts early as well. The goal is to be comfortable and informed, this can be a easily learned early habit, when awareness starts early, it becomes normal. A teenager who understands nuances to their health/breast health will be more likely to advocaate for themselves, know what questions to ask their provider, and find changes early instead of ignoring them.
Why should I do this daily?
Well, knowing how your breasts are normally is very important as a woman of any age. Feeling for lumps or abnormalities can help decide when you think you should go see your doctor/gyno. But mammograms can find cancer before there is even a lump, because some are too small to heal. Deciding to get routinely mammograms is just as important as self checking breast exams.
Where is my breast tissue?
You might just think its the actual fatty parts of your chest, but your breast tissue spans from your collarbone, the top of your abdomen and into your armpit. So examine these areas with your fingers (physically) and with your eyes (visually)!
HOW TO (continue to scroll)
When? It doesn't make a large difference, though most doctors recommend after your period if you still get them. Furthermore, as a teenager, doing them not as often or whenever you remember is OK too.
VISUAL EXAM
Make sure your chest is bare, and preferably be in front of a mirror.
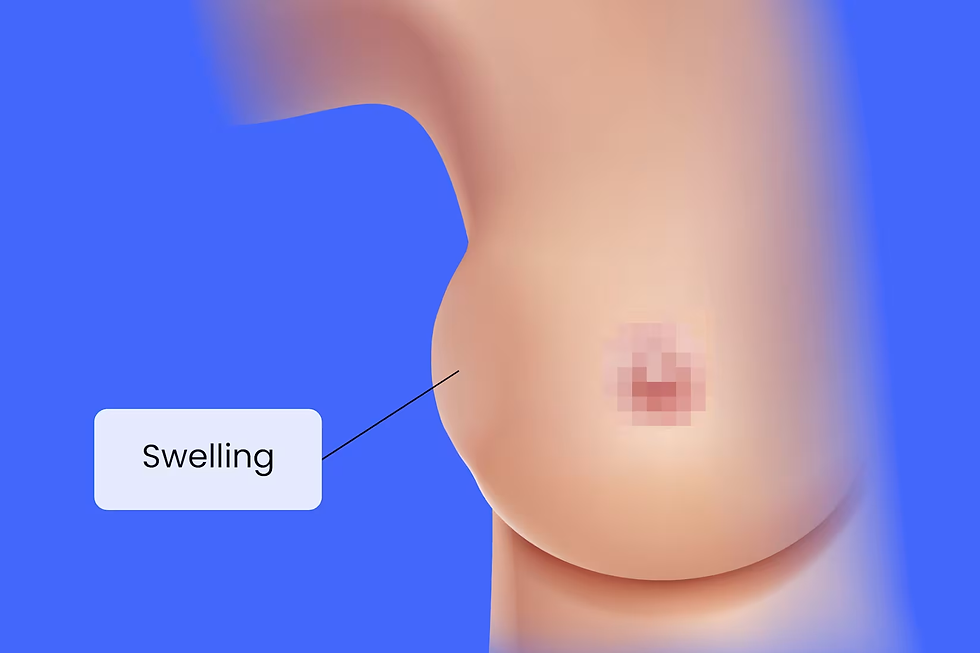
Step 1: do you see any dimpling (bumpy texture, kind of looks like cellulite on your breasts) bruising, purpleness if you have a darker skintone, and redness if you have a lighter skintone, bumps or irritation (itchy bumps), check for lumps and swelling and notice the position of your nipples.


Physical Exam
be bare chested for both type of physical exams!
What are the seven Ps of breast self-examination?
The seven Ps are a guide to help you perform a self-exam. The P’s stand for:
Position: Inspect your breasts both in the mirror and lying down.
Perimeter: Include the area of your breast that extends to your armpit.
Palpation: Move your three fingers in a gentle, circular motion.
Pressure: Use light, medium and firm pressure.
Pattern: Use a pattern to make sure you cover your entire breast.
Practice: Perform self-exams regularly.
Planning: Know what you’re looking for and what to do if something seems unusual.
Lying Physical Exam **for larger breasts or unabled people
lie down, take a pillow and put it under your right shoulder
take your right arm, extend it behind your head so your armpit breast tissue is easy to reach
take your left hand, hold out three fingers and examen your left breast
press on different areas of your breast tissue with light-medium-firm pressure
glide your fingers in a circular motion around the right breast and into your armpit and by your collarbone
use a pattern
squeeze your nipple and check for discharge, and feel under your areola
Repeat steps with your right hand for left breast
Standing Physical Exam
take your right hand, hold out three fingers and examen your right breast
press on different areas of your breast tissue with light-medium-firm pressure
glide your fingers in a circular motion around the left breast and into your armpit and by your collarbone
use a pattern
squeeze your nipple and check for discharge, and feel under your areola
Repeat steps with your left hand for right breast
Additional resources on similar topics are available through the Herscreen Project.
Sources:
(Archbold.org, 2025) https://www.archbold.org/articles/2025/october/breast-health-basics-why-self-exams-screenings-a/
(Cleveland Clinic, 2025) https://my.clevelandclinic.org/health/diagnostics/3990-breast-self-exam
Comments